 Vintro Pro
NL · FR · EN
Vintro Pro
NL · FR · EN
Vintro Pro
NL · FR · EN
Vintro Pro
NL · FR · EN
A label does two things: it shows the customer what the piece is, and it lets you find the piece again by scanning. You set it up once, then print without thinking.
The three templates differ only in where your logo sits. Choose what suits the shape of your label — a wide label can take a logo beside the text, a small one cannot.
Go to 🏢 Company settings and under Label template choose between Compact, Logo on top and Logo beside text.

A QR code carries more data and scans with a phone. A barcode works better with a classic scanner. If in doubt, take both.
Under Code(s) on the label, choose between QR code + barcode, QR code only and barcode only.

This is the step that goes wrong most often. The app has to know how big your labels really are, or the text lands beside or off the label.
The dimensions are not in the settings window itself: click Design your label first. At the top of the window that opens, fill in Width (mm) and Height (mm). Measure your label if you are unsure.

For those who want it exact: you can set the layout yourself instead of using a template. What you see here is what comes out of the printer.
In that same window, tick Set the layout myself, drag the parts around on the preview, and finish with Save layout.

The app sends a label differently to a Zebra than to an ordinary printer or a Phomemo next to your phone. You choose once.
Go to 🏢 Company settings → 🏷️ Labels and printing and under Printing labels choose between Zebra label printer, Regular or portable label printer and Phomemo M220 directly over Bluetooth. That last one prints from your phone, in Chrome on Android or in the Android app. In Safari on an iPhone it does not work: Apple does not let websites use Bluetooth. The first time you pick the printer from a list; after a successful print the app remembers it. Working with two printers? In Design your label, give each profile its own printer under Printer for this profile.
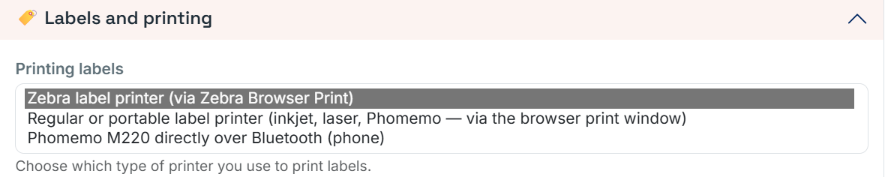
A single label you print from the item itself. Usually you want more: everything that is not sold yet, or exactly the rows you selected.
One label? Open the item and click 🖨️ next to 📝 Basic details (at purchase). That also works for an item you have not saved yet. More labels? Go to 🛠️ Actions → under Print → 🖨️ Print labels for the selected rows or 🖨️ Print labels for all unsold items. Look at the number in the confirmation window before you click Confirm: with "all unsold items" that can run into the hundreds, and they go to the printer one after another.

These pages are free and will stay that way. If you would rather have someone look at your own stock with you, that is available as paid guidance.
Three: Compact, Logo on top and Logo beside text. They differ only in where your logo sits — a wide label can take a logo beside the text, a small one cannot.
A QR code carries more data and can be scanned with a phone; a barcode works better with a classic scanner. If in doubt, take both.
Then the dimensions are wrong. They are not in the settings window itself: click Design label first and fill in Width (mm) and Height (mm) at the top. Measure your label if you are unsure.
Yes. Tick Set the layout myself, drag the parts around on the preview, and finish with Save layout. What you see there is what comes out of the printer.
Yes, through 🛠️ Actions → Printing, either for the selected rows or for all unsold items. Look at the number in the confirmation window first: that can run into the hundreds, and they go to the printer one by one.
Yes, with a Phomemo M220 over Bluetooth. In 🏢 Company settings → 🏷️ Labels and printing, choose Phomemo M220 directly over Bluetooth. It works in Chrome on Android and in the Android app, not in Safari on an iPhone: Apple does not let websites use Bluetooth.